Every time you set up a microphone and hit record, the recorded audio is being influenced by the environment it’s in; whether that be your bedroom, a hall, or a stadium. All sound is affected by the space it’s created in.
Wondering why this should concern you? Well, if you aspire to create recordings that are full, impactful and sound consistent across various sound systems, then your recording environment should be taken seriously. Your room is more important than any recording equipment you have. Simply put, I’d choose an acoustically treated space over expensive gear every time.
Let's delve into the three critical ways your room affects sound: isolation, reflections, and phase. If these terms seem foreign, fret not. We'll unpack each aspect, explore its relevance, and arm you with solutions to enhance your recordings.
1. Isolation
Isolation is all about controlling how sound moves between your recording space and the surrounding environment. In simpler terms: how well does your room keep sound in and unwanted noise out?
Why Is Isolation Important?
- Avoiding Noise Complaints: Your neighbours/roommates will, quite frankly, dislike you for generating noise. Especially if you’re recording a loud guitar amp or even worse… a live drum kit. Furthermore, if you can’t keep noise contained you won’t have the freedom to fire up your recording rig when inspiration strikes late in the evening.
- Preventing Interference: Unwanted noise from TVs, conversations, or street traffic can compromise your recordings. And often, you might not even notice these intrusions until the mixing stage. A good mix will reveal all the intricate details of your recorded audio regardless of whether they are good or bad.
Addressing the Issue
Most people are aware that the answer to this problem is soundproofing, However, true soundproofing requires substantial construction, adding mass and layers to prevent sound transfer. Yet, for many home studios, this approach is neither practical or affordable. So other than moving to a quiet place in the countryside to sidestep these issues, we can look at sound absorption as a practical, affordable option.
Understanding Absorption
Absorption refers to how an object can "trap" sound energy, preventing it from passing through. In essence, it causes sound to lose its energy and thus, obstructs its path.
Fun Fact: Did you know that acoustic absorption converts sound energy into heat?
Materials that are soft, pliable, porous, and dense are generally best at absorbing sound energy.
Common absorption tools include:
- Acoustic Panels/Foam: These popular, rectangular or square panels capture a wide range of frequencies.
- Bass Traps: Designed to absorb the energy-rich lower frequencies, these are bulkier and denser than regular acoustic panels. They can come in the form of larger acoustic panels or thick corner pieces.
Practical Tips for Improved Isolation
- Seal Air Gaps: Sound can leak through even the tiniest of openings. Ensure doors, windows, and any cracks are sealed tight. Even a simple door seal can make a marked difference as it can alleviate a crucial weak point, which will often nullify work you’ve put into other areas..
- Focus on the Low Frequencies: Bass frequencies, which are rich in energy, are difficult to control. Unlike higher frequencies that walls and doors can obstruct, these tend to permeate outside. This results in sound appearing muffled with a pronounced bass when heard from outside the room. To mitigate this, placing bass traps, particularly in room corners, can significantly reduce the sound leakage and reducing your chances of noise complaints.
- DIY Acoustic Panels: Building your own acoustic panels can be cost-effective. With some research and basic tools, you can craft panels that provide decent sound isolation without breaking the bank.
Remember, perfect sound isolation might be a lofty goal, but with some ingenuity and investment, you can drastically improve your recording space. Every small step counts when striving for clear, undisturbed sound.
2. Sound Reflection
What is Sound Reflection?
When sound waves hit a surface, they can bounce back into the room, creating what we know as reflections. Imagine throwing a ball against a wall: it hits the wall and then bounces off it. Sound acts in a similar manner. When the sound continuously bounces around the room, it can create either reverberation or echo.
Reverberation vs. Echo
- Reverberation: Reverb is the continuation of sound in a room after the original source stops. When you clap in your room do you hear a lingering sound after? That's reverberation. The duration of this lingering sound is called the "reverb tail" and will vary depending on how large and reflective a room is.
- Echo: On the other hand, when the reflection time of sound is long enough that you hear a distinct repeat of the created sound, this is called an echo. It typically needs a spacious environment to manifest properly. In smaller spaces, you might experience a "slapback", which is a rapid echo that feels more like two sounds overlapping than a distinct repeat.
Why Reflective Sound Can Be Problematic
While some music enthusiasts appreciate the natural reverb of a room, this "roomy" sound isn’t ideal for all recordings, especially in a home studio. Here's why:
- Skewed Perspective: Reverberation in your home studio might give you a false representation of sound. When your recording plays in different spaces, it may not sound as you intended due to varied room reflections.
- Potential Clashing in Post-Production: An echo or reverb that sounds nice during the recording might not blend well during the mixing stage. As you refine audio elements, the room's influence might be emphasised, leading to an unintended result.
- Signal Chain Issues: Though no rule should be considered law in music production, it’s generally best practice to apply any EQ, compression or saturation before adding effects like reverb and delay. Picking up too much of your room during recording can affect your ability to effectively apply additional processing later.
- Quality of Natural Reverb: Not all rooms are created equal. The reverberation you admire from professional studios often comes from spaces crafted meticulously for acoustic perfection, which your home studio might lack.
- Phase Issues: Phase interference can cause certain frequencies to boost or cancel out, affecting the clarity of the recording. Read more about this below.
Tackling Room Reflections
The best way to mitigate unwanted reverberation and echo is through sound absorption. While we've touched upon absorption for sound isolation, its application for treating reflections slightly varies:
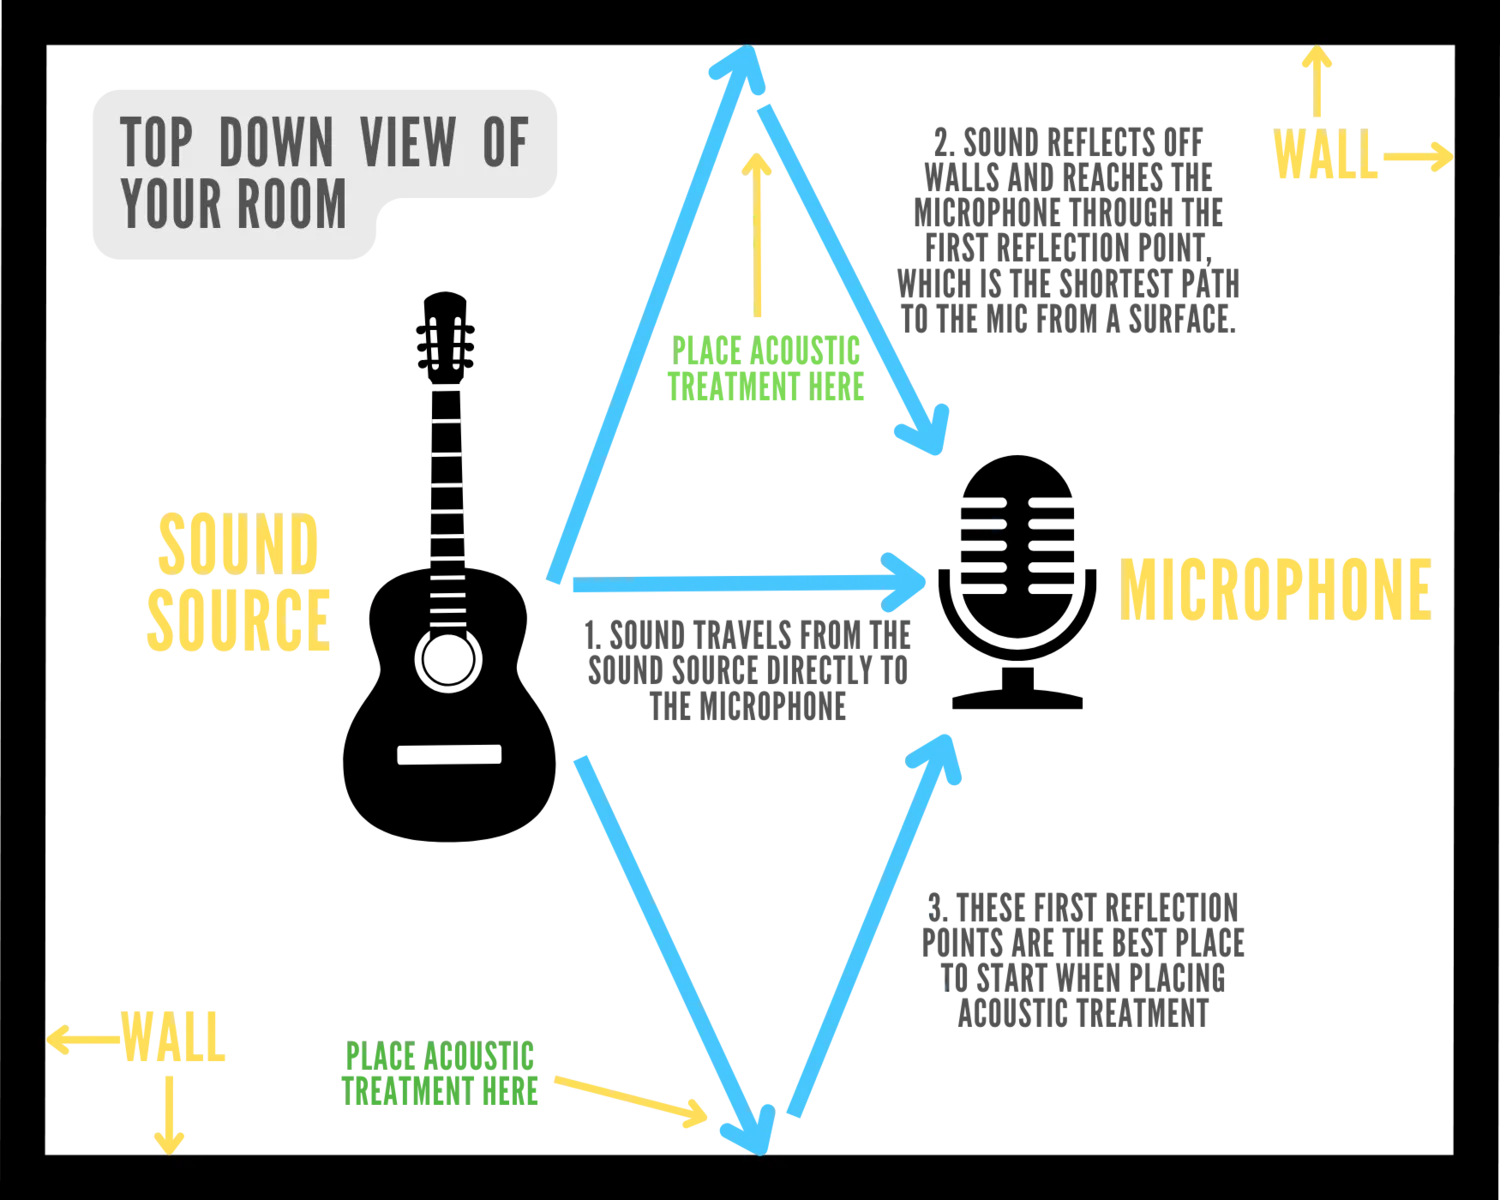
- Absorption Positioning: Think about the path sound takes from the source to its listener or microphone. Position your absorbers strategically to interrupt this path and reduce reflections. Visual aids (like diagrams or images) can be instrumental here to showcase primary reflection points.
- Microphone Selection and Placement: Use directional microphones that focus on the sound source and reduce ambient noise. Closer mic placements can also ensure cleaner recordings by capturing less of the room's character.
- Room Positioning: Every room has spots that sound better due to fewer reflections or bass buildup. You can use this to your advantage to minimise the negative influence of your room on recording. Here are some tips to using positioning to your advantage:
- - Listen: Test out different areas by creating sound and observing its behaviour. Have music playing from your speakers, then walk around the room listening to how the sound interacts within the room. Choose locations where the audio is most balanced sounding to position amps and instruments.
- - Avoid Your Room Center: Central points can amplify room modes, causing uneven frequency responses. There will be frequency imbalances throughout your room but room centres are guaranteed to have these issues.
- - Steer Clear of Corners: There tends to be a build of frequency content here, especially lower frequencies.
- - Map Sound’s Journey: Anticipate how sound travels in your space and position yourself to minimise negative reflections.
- - Use What You Have: Not everyone has the budget for professional treatment. Items like thick curtains, wardrobes filled with clothes, or even mattresses can act as makeshift absorbers. Recording vocals in a wardrobe full of clothes, for instance, can yield surprisingly clear results.
3. Phase and Its Importance in Acoustics
What Is Phase?
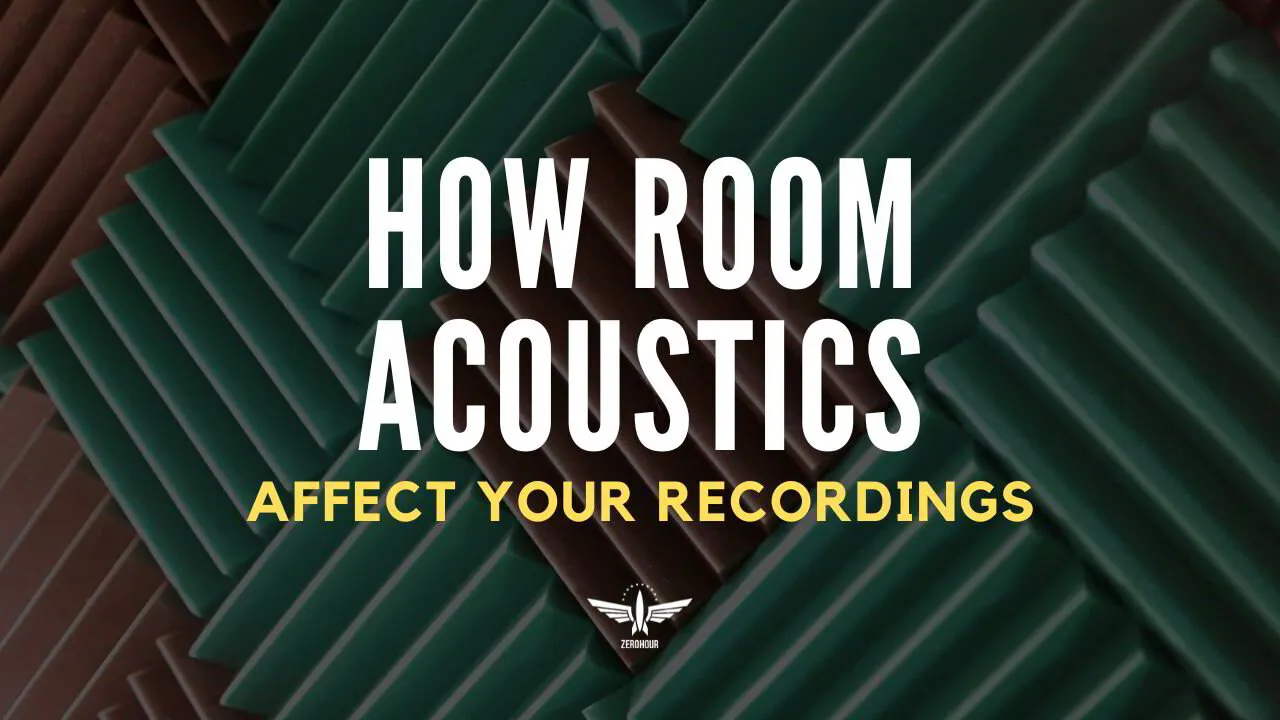
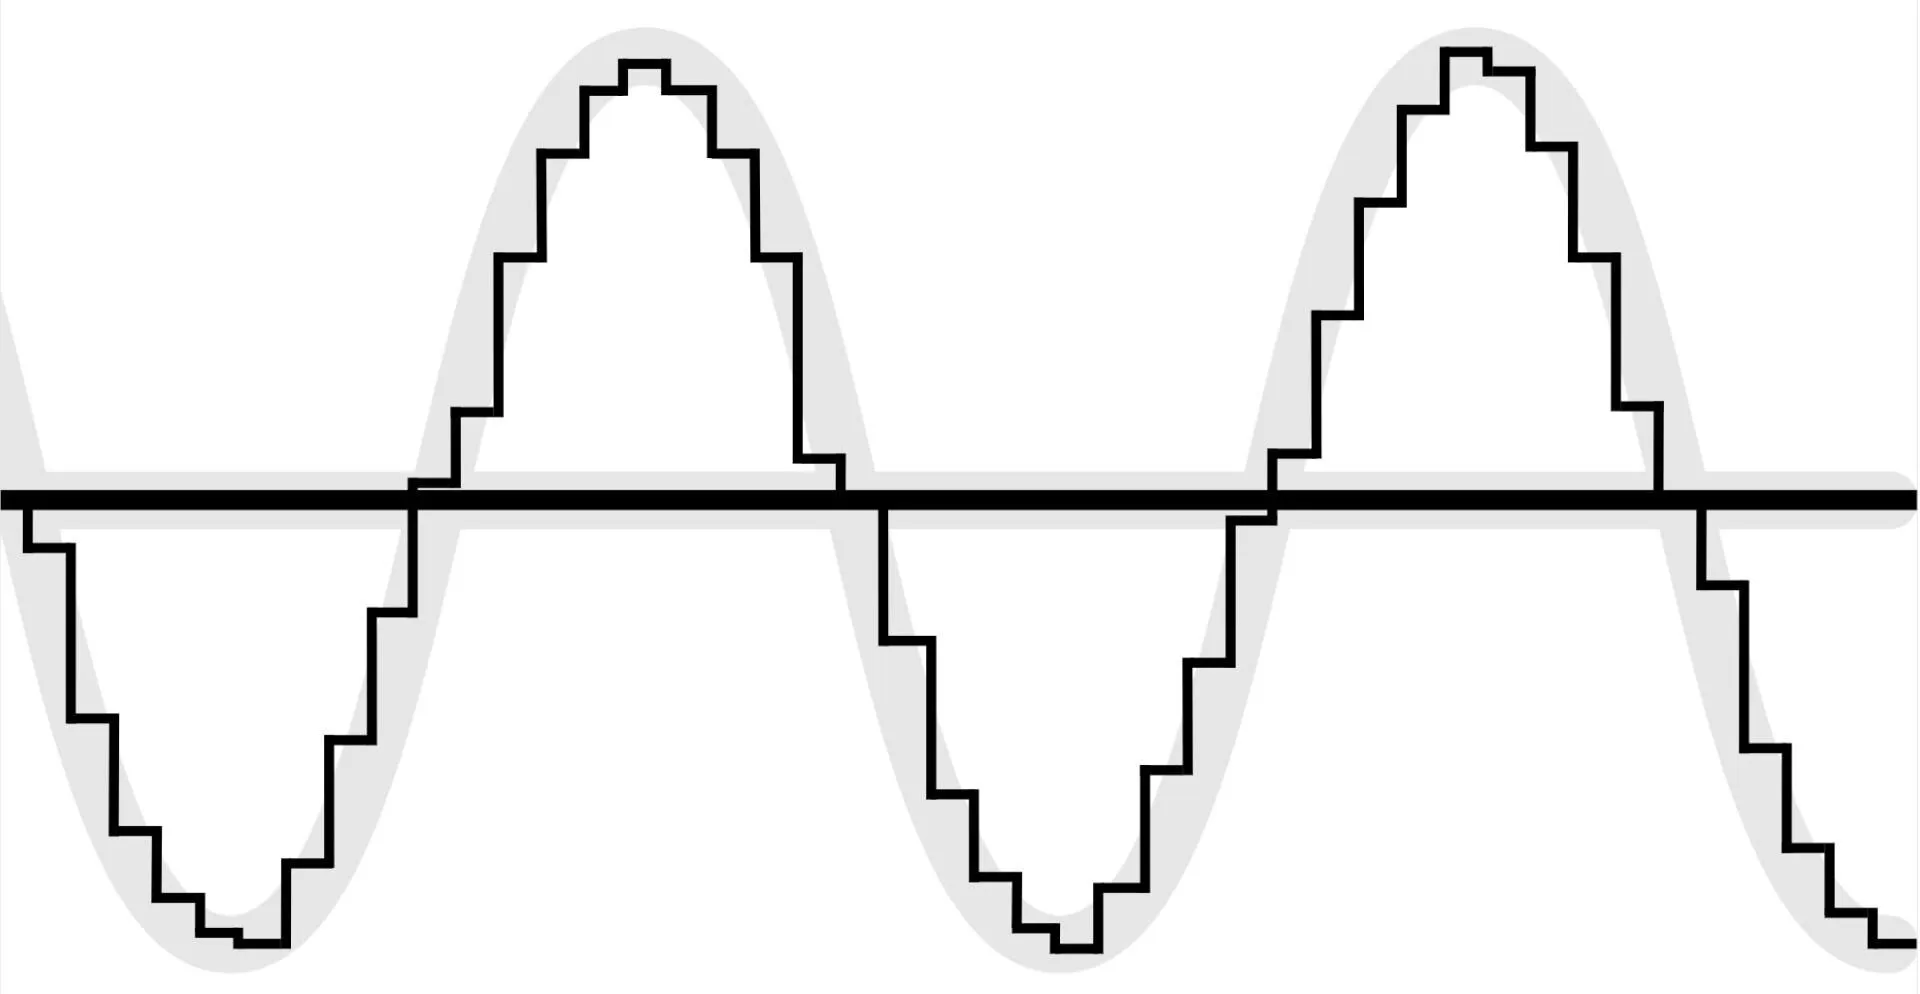
Phase in audio refers to the timing alignment of two or more sound waves. Think of it this way: if the peaks (high points) of two sound waves line up perfectly, they reinforce and amplify each other. However, if the peak of one aligns with the trough (low point) of the other, they cancel each other out.
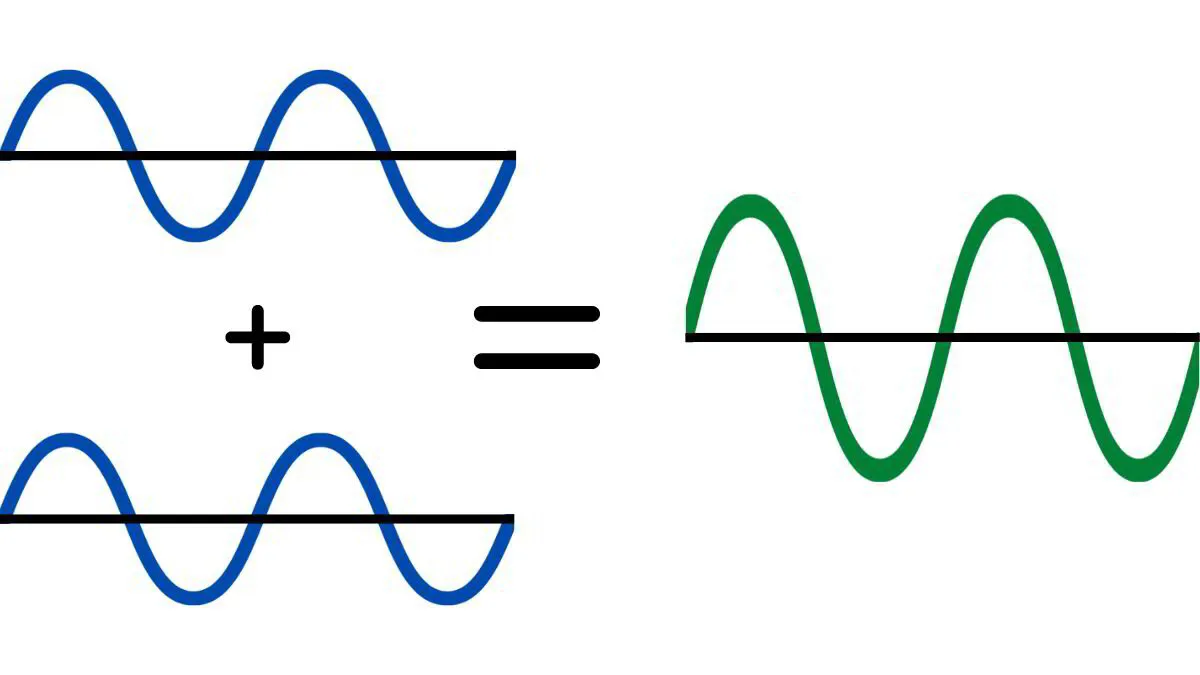
Above, you can see two sound waves. When perfectly in phase they combine to create a sine wave with a much higher amplitude (louder in volume). When perfectly out of phase, they result in total cancellation. But in most real-world settings, misalignment can lead to partial cancellation, impacting the sound quality rather than completely cancelling each other.
How Does Phase Affect Recording Quality?
- Multiple Microphone Recording: Recording a sound source with multiple microphones can result in phase issues because sound reaches each microphone at slightly different times. The overlapping recorded waveforms might cancel each other out or reduce the overall sound quality.
- Speaker Placement: Incorrect positioning of studio monitors can lead to phase problems. Sound from the two speakers can reach the listener's ears at different times, distorting the perceived sound.
- Digital Processing: Some digital effects in recording software can inadvertently change the phase of audio tracks. While most modern software has delay compensation built in, issues can still arise.
- Room Reflections: When sound waves bounce around a room, they can end up reaching a microphone or listener from multiple directions and at different times, leading to phase misalignments.
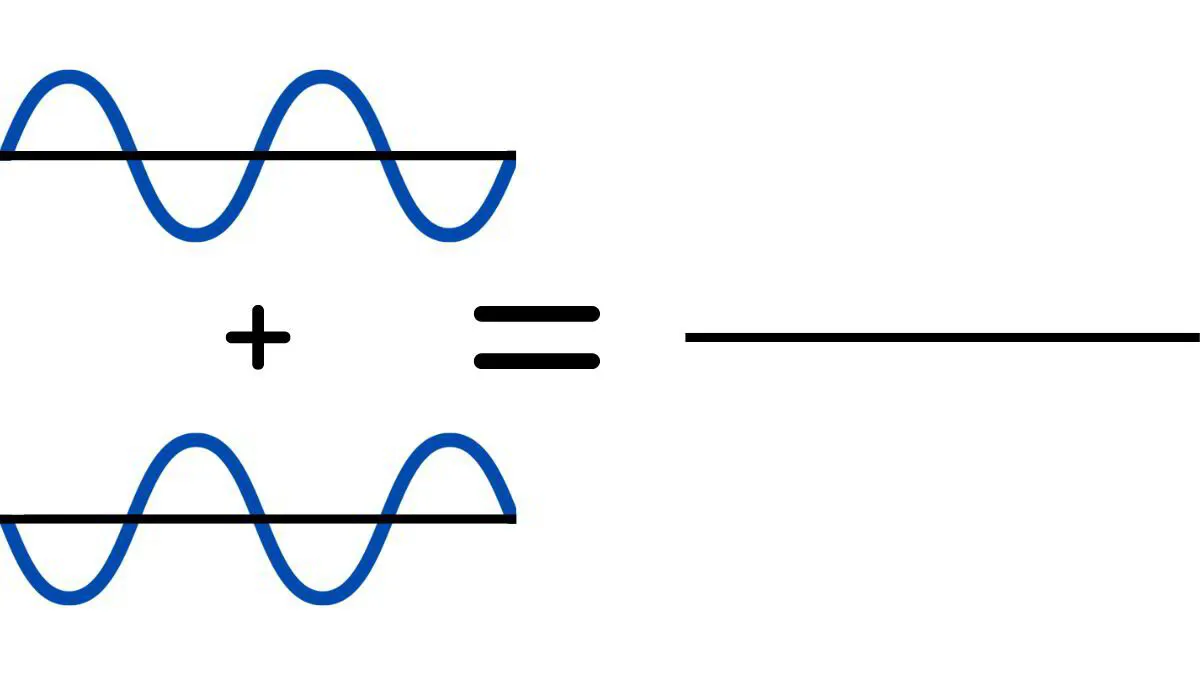
How Sound Waves Function
Imagine a wave on a graph moving up and down over time.
These movements represent changes in air pressure: when the wave moves up, it signifies the compression of air particles, and when it moves down, it indicates rarefaction or spreading out of air particles. This movement of particles is what we perceive as sound. A microphone captures these changes, converting them into electric signals that a computer translates into sound data via a recording interface.
The complete movement from one peak to the next (or from one trough to the next) is called a cycle. Each cycle corresponds to 360 degrees, which is why sometimes engineers might refer to sounds being "180 degrees out of phase," meaning they are perfectly misaligned, resulting in cancellation.
The Role of Your Recording Room in Phase
We now understand that phase misalignment can cause cancellation or loss in quality. Let’s now discuss how this particular issue relates to your room.
Sound doesn’t simply travel from its source straight to the microphone. It bounces around, reflecting off the walls, ceiling, and floor. Each of these reflections can travel back and be captured by the microphone, causing a layered effect of sound arriving at slightly different times.
Consider an average-sized bedroom, with walls 12 ft apart. Knowing that sound travels at roughly 1,100 ft per second, a sound can bounce back and forth between these opposing walls nearly 46 times in one second.
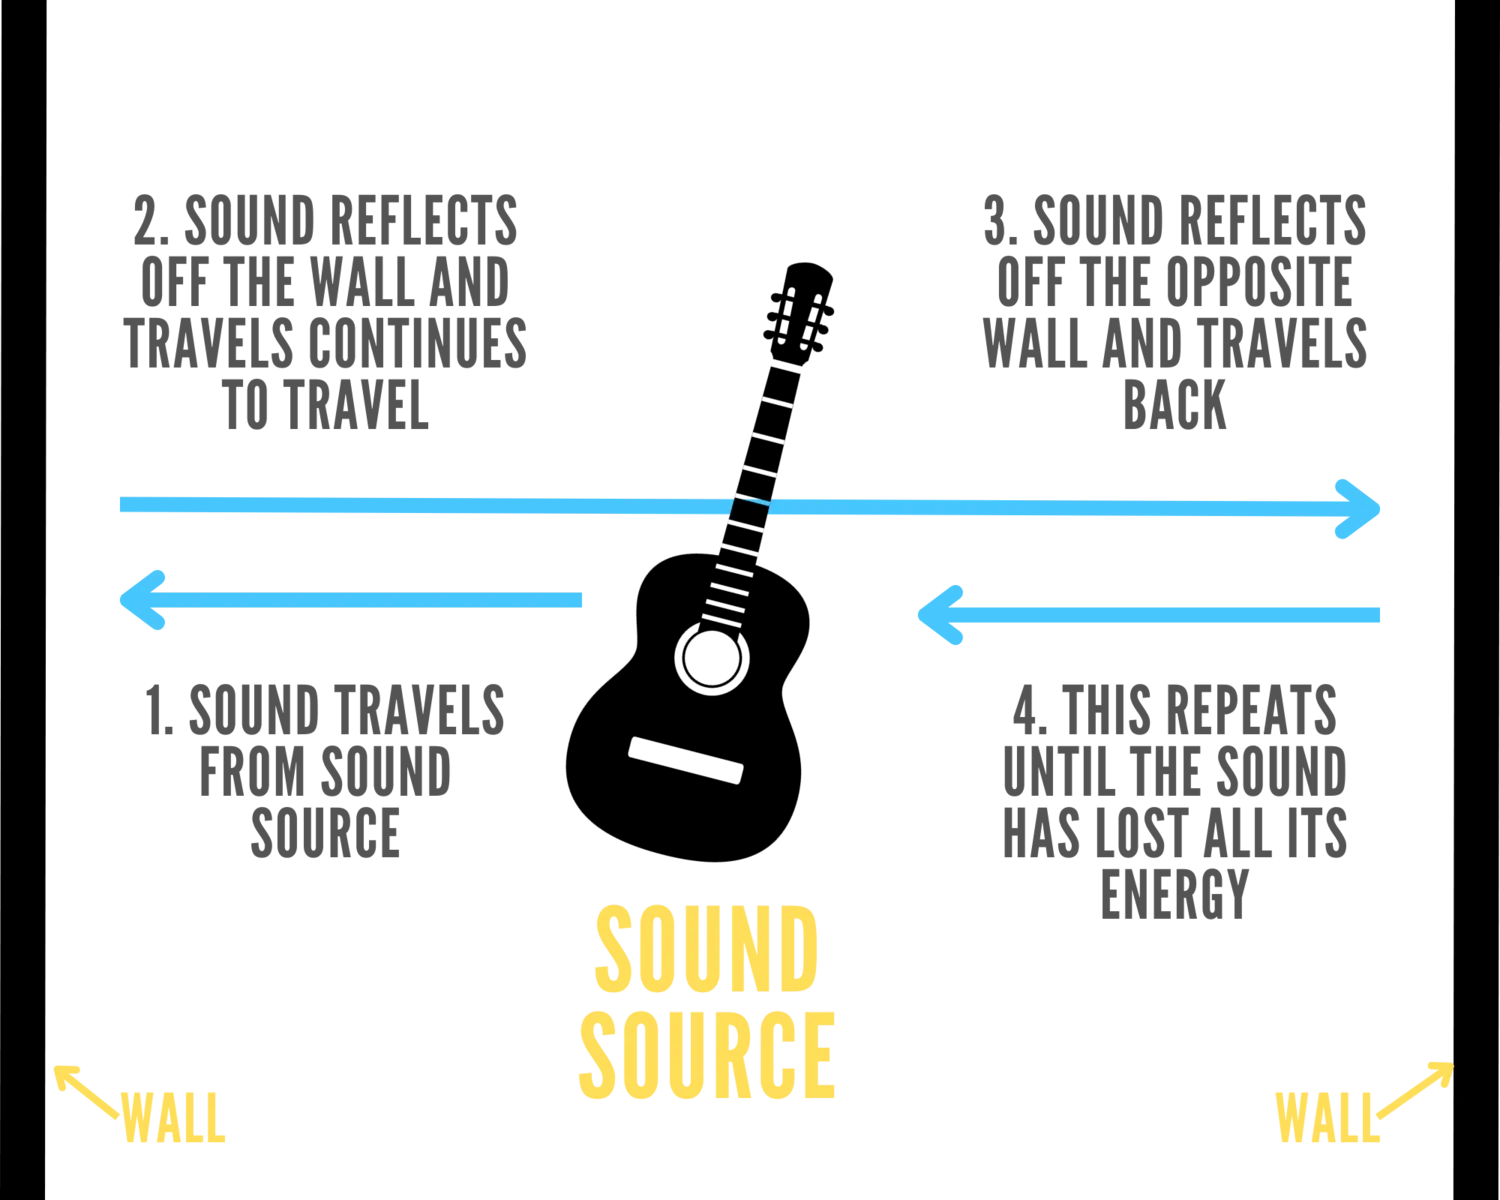
This means that within 1 second, the mic can pick up the same sound about 94 times, and that’s only from one reflection point of thousands within any given room.
In the case of a microphone setup to record a vocal, the sound wave will arrive with the most energy directly from the vocal to the microphone, but these additional reflections mentioned will be picked up, each arriving with a slight different phase relationship to the original sound and thus will create varying boosts and reductions in the captured audio. This will reduce the quality of the recorded audio.
Different materials in your room can reflect sound differently, leading to uneven sound distribution. This is why, when recording, untreated rooms can sound messy or muddy.
How to Counteract Phase Issues
Again we come back to acoustic treatment as a solution to room acoustic problems, as by using absorption, you can reduce sound reflections within your room. Placing acoustic panels in strategic locations helps capture and dampen these reflections, leading to clearer recordings.
If you prefer to keep some natural room sound, diffusion can scatter sound waves, making reflections less direct and problematic. This works best in larger spaces, which is why smaller home studios often lean more towards absorption.
Final Thoughts
As we've explored, the environment in which you record is more than simply a backdrop—it's an integral part of the sound itself. From room reflections to poor isolation and phase issues, your room's acoustics can determine the success of your recording.
Whether you're a home producer on a budget or setting up a professional studio, the principles remain the same. Careful consideration of the room's layout, choice of microphone, and strategic positioning of absorption materials can transform an ordinary space into an extraordinary recording environment. The quality of your recording can be vastly improved by the understanding and mastery of your space.
As always, if you have any thoughts, comments or tips of your own don’t hesitate to get in touch. Learning is made better together. Thanks for reading.
LEARN HOW TO RECORD GREAT VOCALS
Vocals are the heart and soul of every great track, and can distinguish between a professional and an amateur recording.
Whether you record at a studio or at home it's important to learn the steps needed to deliver and record a great vocal.
Download our free guide, this will help you get the perfect vocal take without needing to buy more equipment.
7 STEP VOCAL PRODUCTION FORMULA
Capture The Perfect Vocal Take Every Time, With The Equipment You Have
Click the button below to get your free download